1. Prepare the CSV Transaction File
Only one file is required — a single CSV UTF-8 transaction file.
Sec 1291 Example (CSV)
MTM 1296 Example (CSV)
Required columns (must match exactly):
- Date — YYYY-MM-DD
- Details — text only; must not contain commas, quotes, or line breaks
- Units — numeric only; no thousands separators
- Value — numeric only; no thousands separators or currency symbols

Important rules:
- Calculator does not store or remember any data — each run must include full historical PFIC transactions from the first purchase up to the tax year.
- All Sale / Disposition transactions must use a negative Units value. Any positive Units entry will be interpreted as an increase in holdings.
- If the Units or Value fields are blank in your CSV, you must fill them with 0.
2. Upload File
Click the upload area or drag your CSV file into the box. After uploading, the panel on the right will switch to the Transaction Type Mapping section automatically.
Supported Format: CSV (UTF-8 only). If using Excel, save your file as CSV before uploading.
3. Category Mapping
The calculator auto-identifies categories based on Details, but every item must be reviewed and confirmed.
Available categories:
- Purchase
- Distribution
- Reinvestment
- Sale
- Return of Capital
- Cost Base Adjustment
- Ignore (excluded from PFIC computation)
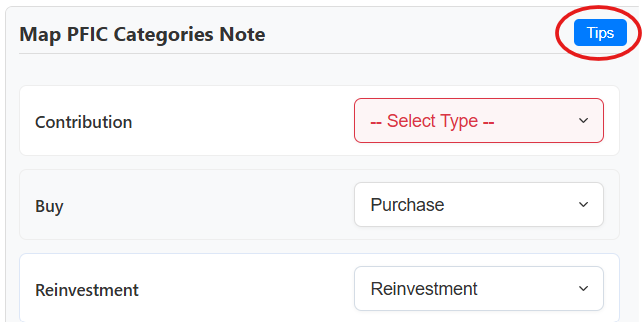
Entries marked with
-- Select Type --
must be manually mapped.
All other auto-identified categories must be reviewed and confirmed
item by item
— only accurate categorization will produce accurate calculations.
Any transaction marked as Ignore is excluded from the calculator.
Ignore items must not affect cost basis, distributions, gains, or any Form 8621 amounts.
For the full list of items that should be mapped to Ignore, see: -->
PFIC Transactions That Should Be Ignored.
4. Select Settings
Settings are displayed on the left panel of the calculator.
Required:
- Tax Year — must be selected.
- Currency — must be selected.
- Ownership % — percent held by the PFIC owner.
- Ending Balance — optional; used for Form 8621 Part I, Line 4.
- PFIC Start — keep the default unless the PFIC was identified after acquisition or you became a U.S. taxpayer later. (Required for MTM)
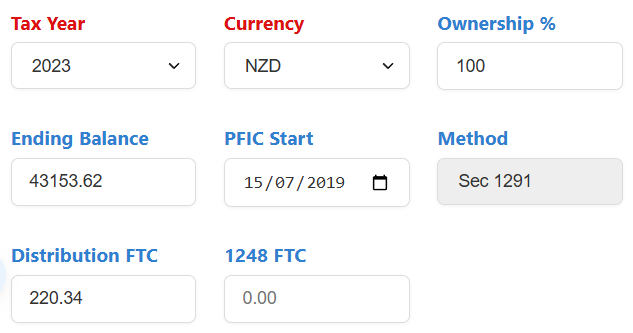
- Method — auto-selected based on your CSV (Sec 1291 or MTM).
- Distribution FTC — only enter foreign tax withheld on distributions.
- 1248 FTC — rare; applies only to Sec 1291 sales triggering §1248 with foreign tax paid.
5. Run Calculation
Once all transaction categories are mapped, the
green Run PFIC Calculation button will become enabled.
After confirming the tax year, currency, and all other required settings are correct,
click the button to start.

6. License Verification
After clicking Run PFIC Calculation, a license verification window will appear.
You must enter your email and your license code.
Calculation will only start after the license code is validated.
If you don’t have a license code, click buy me a coffee ☕ to support the tool. Send the payment screenshot to me by email, and you will receive a license code within one business day.

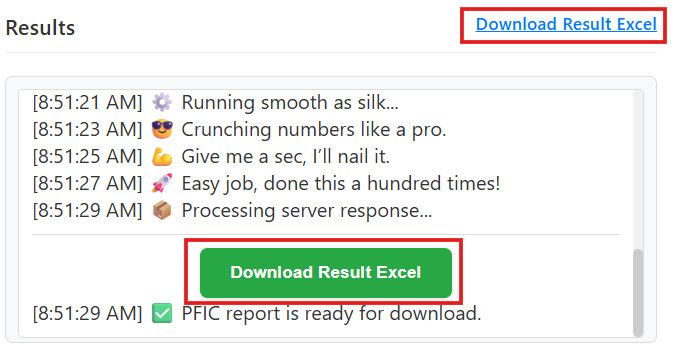
7. Download Result Excel
When the calculation is complete, a green Download Result Excel button will appear at the bottom-right of the page. A blue download link will also appear at the top-right; both point to the same file.
The calculator does not store any history. You must download the Excel file immediately after each calculation. If the page is refreshed, the file can no longer be retrieved.
6. Output Files
Results are delivered as an Excel workbook with multiple sheets.
A. Section 1291 Outputs Download Sample Section 1291 Result Excel
- CCH_8621_Input — ready for CCH Axcess / ProSystem fx
- 16a_Summary — IRS-required attachment
- 16a_Disposition — if disposition occurred
- 16a_Excess_Distribution — if distributions occurred
- CCH_Upload — additional worksheet uploadable to CCH
- 8621 Filing Example — Part I and Part V mock-up
- Other IRS forms (1040, Sch 1, Sch 2, Sch B, Sch D, 8949, 1116)
- PFIC_WS — main working paper with all calculations
B. MTM (§1296) Outputs Download Sample MTM (§1296) Result Excel
- MTM_Calculations — all MTM computations
- 8621 MTM Filing Example — Part I, II, IV
- CCH_1.21_Additional — additional worksheet uploadable to CCH
- CCH_6.2_ElectionC — Section 1296 MTM election worksheet for CCH
- CCH_6.3_Sale1296 — CCH worksheet for MTM-related sales
- Other IRS forms (1040, Sch 1, Sch D, 8949)